

Changing your car’s oil is one of the most essential maintenance tasks that every vehicle owner should be familiar with. Regular oil changes are crucial for ensuring the longevity and efficient performance of your engine. This DIY guide will walk you through the process step by step, making it easy for even novices to perform this task with confidence.
The oil in your engine acts as a lubricant that reduces friction and helps to regulate temperature. Over time, however, oil can become dirty and lose its effectiveness, leading to potential engine damage. By regularly replacing the oil, you can help maintain optimal engine health and avoid costly repairs down the line. Whether you’re looking to save money or simply enjoy the satisfaction of a do-it-yourself project, changing your car oil is a rewarding and practical skill to learn.
In this guide, we will discuss the necessary tools and materials, provide detailed instructions, and offer tips to ensure your oil change goes smoothly. By following these steps, you can keep your vehicle running smoothly and efficiently for years to come.
Gather Necessary Tools and Materials for Oil Change
Before you start the oil change process, it’s essential to gather all the necessary tools and materials to ensure a smooth and efficient experience. Here’s a list of what you will need:
1. Engine Oil: Select the right type and viscosity of oil recommended for your vehicle. Refer to your owner’s manual for specifications.
2. Oil Filter: Purchase a new oil filter compatible with your car. A fresh filter will help maintain engine health and performance.
3. Oil Catch Pan: This is crucial for collecting the old oil during the change. Choose a pan that can hold the entire volume of your engine’s oil.
4. Wrench Set: You will need a socket or an adjustable wrench to remove the oil drain plug and the oil filter. Ensure the sizes match your vehicle’s requirements.
5. Funnel: A funnel will assist in pouring new oil without spills, making the process cleaner and easier.
6. Rags or Paper Towels: Keep these handy for cleaning up any spills or for wiping surfaces during the change.
7. Safety Gear: Gloves and goggles are recommended to protect your skin and eyes from oil and other contaminants.
8. Jack and Jack Stands: If you need to lift your vehicle for better access, a jack and proper jack stands are necessary to ensure safety.
Once you’ve collected all these items, you’ll be well-prepared to carry out the oil change procedure smoothly and efficiently.
Properly Drain Old Oil and Replace Oil Filter
Changing your car’s oil involves more than just adding new oil; it is crucial to properly drain the old oil and replace the oil filter to ensure optimal engine performance. Follow the steps below to successfully complete this process.
1. Gather Necessary Tools and Materials: Before starting, collect everything you will need. This includes an oil drain pan, wrenches, a new oil filter, and new oil. Ensure that the oil filter you choose is compatible with your vehicle.
2. Prepare the Vehicle: Park the car on a level surface and turn off the engine. Allow the engine to cool for a few minutes to avoid burns. Engage the parking brake and, if you have them, use wheel chocks for added safety.
3. Locate the Oil Drain Plug: Slide under the vehicle and identify the oil drain plug, typically found at the lowest point of the oil pan. Make sure to position the oil drain pan directly beneath the plug to catch the old oil.
4. Drain the Old Oil: Using a wrench, carefully loosen the drain plug. Allow the old oil to flow into the drain pan completely. Be cautious, as the oil may still be warm. Once the flow of oil slows down, remove the drain plug completely and let the remaining oil drip into the pan.
5. Replace The Oil Filter: While the old oil is draining, locate the oil filter. Use an appropriate tool, such as an oil filter wrench, to unscrew it. Be prepared for some oil to spill out when removing the filter. Before installing the new filter, apply a small amount of new oil to the rubber gasket of the filter. This ensures a better seal and makes future removal easier.
6. Install New Oil Filter: Screw in the new oil filter by hand, making sure it is snug but not overly tight. Refer to the manufacturer’s instructions for any specific torque specifications.
7. Reinstall the Drain Plug: Once all the old oil has drained and you have replaced the filter, reinstall the drain plug. Tighten it securely with a wrench, taking care not to strip the threads.
By following these steps, you will effectively drain the old oil and install a new oil filter, setting up your vehicle for a successful oil change. This routine maintenance is essential for your engine’s longevity.
Add New Oil and Check Levels for Optimal Performance
Once you have completed the oil change, it’s crucial to add the new oil correctly and check the levels to ensure your vehicle performs optimally. Follow these steps to achieve the best results:
-
Select the Right Oil: Ensure you have the correct type of oil for your vehicle. Refer to your owner’s manual for specifications on viscosity and oil type.
-
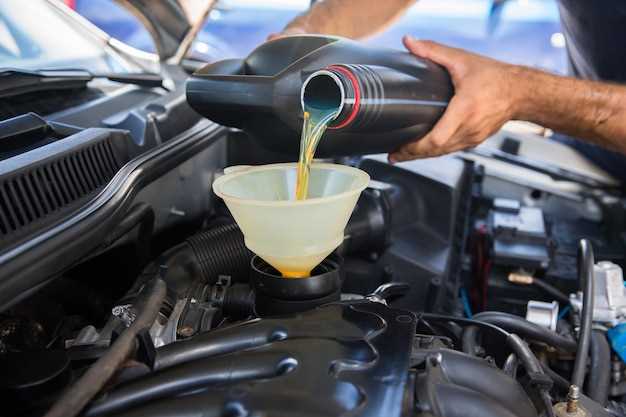
Prepare to Add Oil: Remove the oil filler cap located on the top of the engine. This is typically marked with an oil can symbol.
-
Pour the New Oil: Use a funnel to avoid spills and pour in the new oil gradually. This method helps to prevent overfilling.
-
Check Oil Level: After adding oil, use the dipstick to check the level:
- Reinsert the dipstick fully, then remove it to check the oil level.
- The optimal level should be between the marked lines on the dipstick.
- If necessary, add small amounts of oil and recheck.
-
Secure the Cap: Once the oil level is satisfactory, put the oil filler cap back securely to prevent leaks.
-
Dispose of Old Oil Properly: Take the used oil to a recycling center or a facility that disposes of oil safely. This step is vital for environmental protection.
Regularly checking and changing your oil as part of your DIY maintenance routine will contribute to your vehicle’s longevity and performance. Ensure to monitor the oil level periodically, as low oil levels can lead to engine damage.


